Brooch Identifier by Photo: Pin Mechanisms, Motifs, and Era Clues
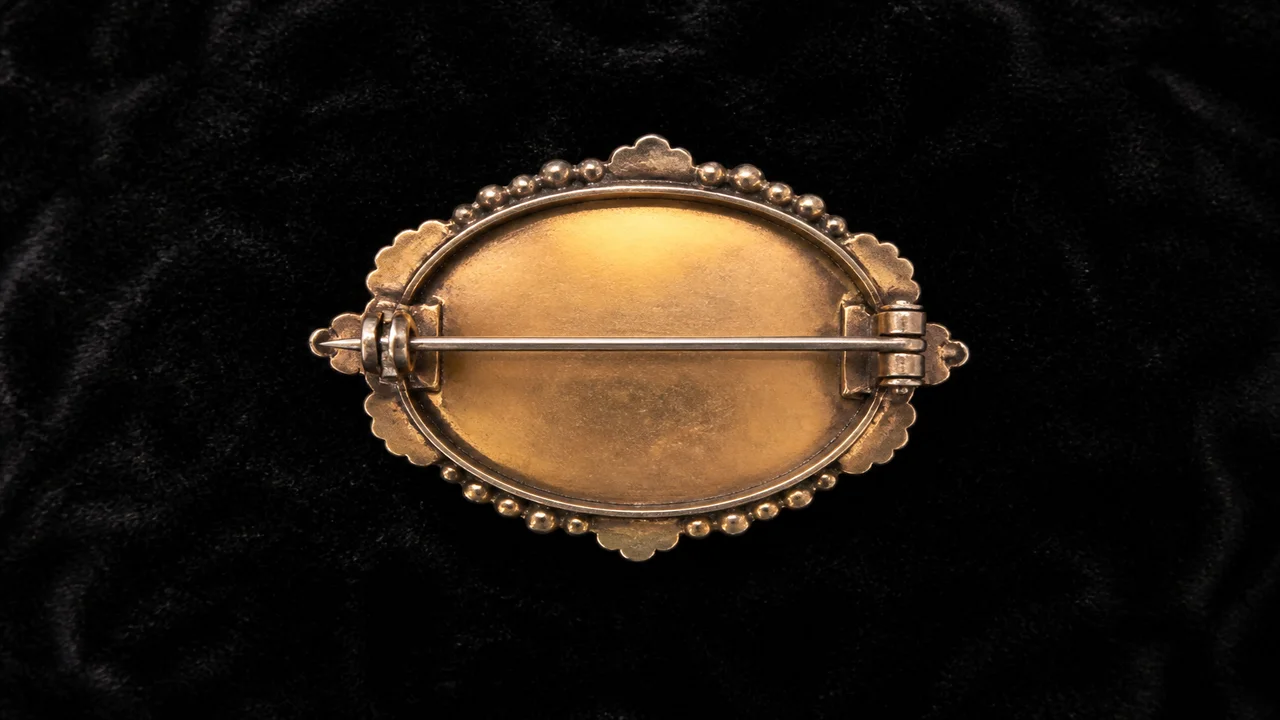
The back of a brooch is often as informative as the front. Pin length, hinge, catch, frame, solder, rivets, pendant loops, and marks can narrow construction and era possibilities, while the front provides motif, stones, enamel, and design language.
Boundary: Jewelry Identifier supplies photo-based research clues. It is not a certified appraisal, metal assay, brand authentication, or gem laboratory, and it cannot prove an exact date or value from images.


Brooch or Pin? Start With the Form
“Brooch” broadly covers ornamental pins, while collectors use more specific names for form and purpose. Correct vocabulary improves image search and archive research.
| Form | Visual clues | Search terms |
|---|---|---|
| Bar brooch | Long narrow horizontal body | bar pin, stock pin |
| Circle brooch | Open or decorated circular form | circle pin, wreath brooch |
| Cameo brooch | Raised carved profile in frame | cameo material, portrait brooch |
| Dress clip | Clip mechanism rather than long pin stem | dress clip, fur clip |
| Duette/double clip | Two clips attach to a brooch frame | double clip brooch, convertible clip |
| Brooch-pendant | Pin fitting plus bail or folding loop | convertible pendant brooch |
| Stickpin | Decorative top on long straight pin | stick pin, tie pin |
Pin Mechanisms and What They Suggest
Inspect the hinge, stem, catch, and tip as a system. A simple tube hinge, T-hinge, C-shaped open catch, trombone catch, safety catch, rollover clasp, or clip mechanism can support a period range. Yet mechanisms were used at different times in different countries and remained in workshops after newer designs appeared.
- C-clasp: Open C-shaped catch; common in older work but reproduced and replaced.
- T-hinge/tube hinge: Broad historical use; construction quality and solder matter.
- Trombone catch: Sliding cylindrical closure associated with many European pieces.
- Safety or rollover catch: Rotating closure, widespread in twentieth-century and later jewelry.
- Dress clip: Hinged toothed clip; classify separately from a standard brooch pin.
A pin extending beyond the brooch edge may be an age clue, but replacement stems and handmade revival work make it non-conclusive.
Motifs as Identification and Era Clues
Motifs help locate design movements, makers, and collector categories. Common subjects include bows, crescents, swallows, insects, flowers, snakes, stars, hands, hearts, portraits, crowns, leaves, birds, branches, geometric forms, patriotic symbols, and mourning imagery.
Record the motif literally before assigning symbolism. A black brooch is not automatically mourning jewelry; a crescent is not enough to establish a Victorian date; Egyptian-style motifs can belong to multiple revival periods. Materials and construction must agree with the proposed context.
Use discover vintage jewelry era from photo to compare broader Art Nouveau, Edwardian, Art Deco, Retro, and later design cues.
Construction and Back-Side Checklist
- Photograph the entire back straight-on before cleaning.
- Capture hinge, catch, pin tip, solder, rivets, screws, and detachable components.
- Look for cast texture, saw piercing, stamped sheet, hand engraving, molded details, and machine finishing.
- Record whether stones are prong-, bezel-, pavé-, channel-, or glue-set and whether backs are open or closed.
- Check for replaced findings, lead solder, reinforcement plates, missing drops, and converted pendant fittings.
- Photograph every mark and retain uncertain letters exactly as seen.
Repairs are not automatically bad; they are part of the object’s history. They can, however, invalidate a clasp-based date or affect originality and value.
Marks, Materials, and Stone Clues
Brooch marks may appear on the frame, pin, catch, small plaque, clip, or pendant fitting. A purity mark may refer to one component rather than every part. Maker marks and patent numbers are leads to verify, not instant authentication.
| Photo observation | Possible lead | Verification needed |
|---|---|---|
| Gold-color body with wear | Solid alloy, rolled gold, plate, brass | Metal testing |
| Colorless faceted stones | Diamond, paste, glass, zircon, simulant | Gemological testing |
| Black carved plaque | Jet, glass, onyx, plastic, other material | Material examination |
| Painted or fired color | Enamel, cold paint, resin | Magnified inspection |
| Signed back | Maker or designer candidate | Mark and construction authentication |
For visible signatures, use maker-mark identification to form a research hypothesis.
Brooch Photo Workflow
- Use a plain background and diffuse light; take straight front and back views.
- Add both side profiles so hinge, catch, relief, stone depth, and conversions are visible.
- Include macro images of motifs, marks, stones, enamel, solder, damage, and repairs.
- Add a ruler and record width, height, depth, and gram weight.
- Run separate searches for form, motif, mechanism, maker mark, and construction rather than one vague query.
- Compare multiple dated, well-documented examples and note contradictions.
- Seek specialist review before claiming exact age, maker, materials, or value.
What a Photo Can and Cannot Prove
| Can support | Cannot prove |
|---|---|
| Brooch form, motif, visible mechanism | Exact manufacturing date |
| Construction and repair observations | Whether every fitting is original |
| Visible marks and patent leads | Maker or brand authenticity |
| Apparent material and stone candidates | Metal purity or gem species |
| Comparable style examples | Certified appraisal or guaranteed value |
Photo identification is strongest when it produces a checklist of evidence still needed. For inherited or valuable pieces, a vintage-jewelry specialist, gemologist, and appraiser may each answer a different part of the question.
Dating a Brooch Without Overclaiming
Build a date range from several independent clues: mechanism, construction, hallmark system, motif history, stone cutting, known maker period, provenance, and documented comparisons. If one clue conflicts, investigate replacement or revival work rather than forcing a date.
State conclusions in levels: “visually consistent with,” “probably,” “documented by,” or “confirmed by specialist.” Jewelry Identifier helps with the first level. It does not issue certified authentication, laboratory grades, or formal appraisals.
Frequently Asked Questions
Can a photo identify an antique brooch?
A photo can support style, mechanism, motif, maker-mark, and era hypotheses, but exact age and authenticity require broader evidence and specialist review.
Does a C-clasp mean a brooch is Victorian?
Not by itself. C-clasps were used across long periods and can be replaced, reproduced, or retained in later work.
Where should I look for marks on a brooch?
Check the back plate, pin stem, hinge, catch, frame edge, pendant loop, plaques, and removable components.
What brooch photos are most useful?
Provide straight front and back images, side profiles of hinge and catch, macro marks, edge construction, stones, damage, and a ruler view.
Can an app appraise a brooch?
No. Photo identification is not certified appraisal or laboratory grading. Metal, stones, maker, age, condition, and value need appropriate verification.